3D object in Photoshop sounds make surprising but that’s true. Of course the 3D is common in past series of Photoshop but not so much develop in previous series as like current. Now Photoshop CC is latest but CS6 is also perfect for 3D. We all know that Photoshop is 2D and raster base platform but the platform gradually turn the face from 2D to 3D.
Guys, those who are already use 3D like Maya, Max or any other kind of 3D platform they know about 3D and what kind of work is done here ? But those are totally new for 3D they can start a good experience with this.
What kind of 3D work possible in Photoshop?
3D work is totally different from 2D especially from dimension point of view. It gives you X, Y, Z axis. 3d can create more realistic the object just because it create 1 more dimension and also create more live more realistic. You can create 3D object with modeling, texturing, and lighting.
What kind of Scope available?
In scope point of view than, you will get as well as 3D scope like – rotate, scale, and move. You can use mesh, material, light properties and all the properties give you full details of each own categories. Environment is the one of the best field is available here to create good background. Another scope is you can import the 3D file into it and also export it .3DS, .DAE and many other. .OBJ is the best extension among all them just because it support maximum 3D platform and Layer option is work for 3D. So no doubt its give you full control of each and individual object.
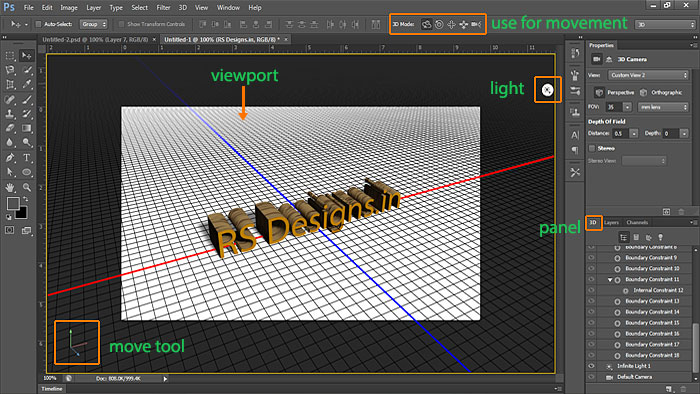
- Camera
You can properly visualize the object from top, bottom, side, front, back view also you can use custom view of camera and the most important part of camera is “depth of field” is also available.
- Material
Material gives you to create texture, coloring, bump, shine, reflection, illumination, opacity, refraction and many more. If you want to texture properly than you can do it help of UV solve and default textured materials are also available.
- Light
After completing the texture part lighting part is necessary to visualize the object properly. There are three types of light available point, spot, infinite. Each light give you full properties so easy to customize. Color changing option of light is possible. Shadow visually moves just the opposite direction at the time of light movement. Default light presets are also available and you can use more than one light as per your requirement.
- Render
The final part for every output is render so you have to render you image by press render button or use ALT+SHIFT+CTRL+R. render time depend on the material and its characteristics. You can see your rendering status at the time of render. Then export layer or you can save it JPEG, PNG any format.

How to Start 3D work?
Now the final step how to start it. Create a new layer and draw any art or text. By selecting the layer goto 3D option and click “New 3D Extrusion from selected layer ”.



Leave A Comment